You are using an out of date browser. It may not display this or other websites correctly.
You should upgrade or use an alternative browser.
You should upgrade or use an alternative browser.
PowerPCB v1.08
- Thread starter Sascha
- Start date

That's exactly what I thought.
When my battery is full, my charger lights up green and only trickle charging takes place.
This way the battery is always full and the mower always starts with a full battery.
If you have a battery without BMS or the charger does not support it, you must use the charging circuit.
When my battery is full, my charger lights up green and only trickle charging takes place.
This way the battery is always full and the mower always starts with a full battery.
If you have a battery without BMS or the charger does not support it, you must use the charging circuit.
YES of course.When my battery is full, my charger lights up green and only trickle charging takes place.
This way the battery is always full and the mower always starts with a full battery.
You can put it like you want ,but for me it's better like i describe and maybe can work on the 2 cases
Actually to solve the issue on older Power PCB version the mower automatically power off and the end of charging process if there is no timer.
")
SefanH
Well-known member
Ich betreibe meinen Mäher am BMS Ladeanschluss. Damit kann man laden und entladen! Die "normalen" Anschlüsse nutze ich überhaupt nicht. Einfach mal testen!Grüß dich Sascha,
Sehr schön zu hören, ich habe mal eine frage gäbe es die möglichkeit eine 2. Ladebuchse auszuführen bei dem Powerboard. Mein Akku Besitz eine eigene bms und hatt einen extra Ladekabel dafür. Ich habe zwar den Händler gefragt ob ich auch am Power Out Laden könne aber weiß nicht ob er dann noch vernünftig regelt.!?
Vg
So PowerPCB's sind angekommen.
Leider habe ich momentan keine Zeit um eine auf Ihre Funktionen zu testen, da ich noch eine ganze Weile im Umbaustress bin.
Das Haus muss bis zur Einschulung unseres Jüngsten fertig sein, sonst bekomme ich ärger mit der Regierung")
Traut sich jemand zu testen?
Leider habe ich momentan keine Zeit um eine auf Ihre Funktionen zu testen, da ich noch eine ganze Weile im Umbaustress bin.
Das Haus muss bis zur Einschulung unseres Jüngsten fertig sein, sonst bekomme ich ärger mit der Regierung
Traut sich jemand zu testen?
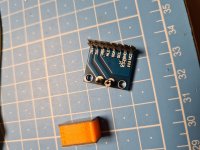
So, die Power PCB ist bestückt, aber noch ungetestet. Wie macht ihr die Leistungsverbindung zu den INA's? Nur feste Lötbrücken? Ich würde die INA's gern steckbar lassen um evtl. schnell tauschen zu können.
The Power PCB is assembled, but still not tested yet. How do you connect the power pins from the INA to the PCB? Fixed Solder-Bridges only? I would nicely have the INA's plugable.

The Power PCB is assembled, but still not tested yet. How do you connect the power pins from the INA to the PCB? Fixed Solder-Bridges only? I would nicely have the INA's plugable.
Richtel
Well-known member
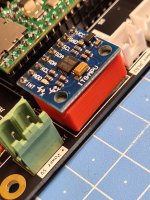
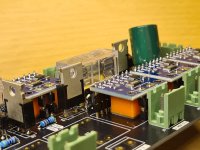
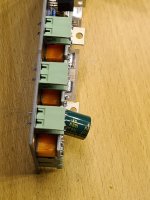
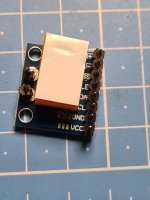
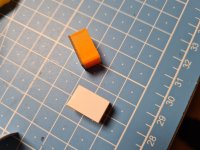
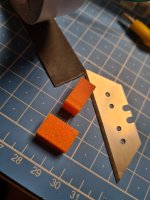
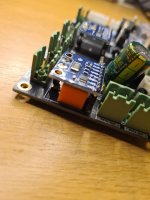
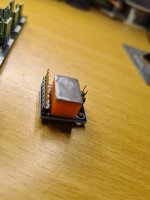
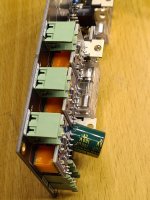
Ich habe meine Inas im Roboter noch mit solch kleinen 3d gedruckten abstandsthalter und doppelseitigen Klebeband von 3M versehen. So können Sie sich nicht lockern bei Erschütterungen. Allerdings rate ich weniger Klebefläche zu wählen als ich hier auf den Bildern, Mann bekommt sie sonst wirklich schwer ab

I have provided my Inas in the robot with such small 3d printed spacers and double-sided adhesive tape from 3M. That way you can't loosen up if there's a jolt. However, I advise choosing less adhesive surface than I do here in the pictures, otherwise it is really difficult to get off☝
I have provided my Inas in the robot with such small 3d printed spacers and double-sided adhesive tape from 3M. That way you can't loosen up if there's a jolt. However, I advise choosing less adhesive surface than I do here in the pictures, otherwise it is really difficult to get off☝
Attachments
-
 20230323_182459.jpg867.6 KB · Views: 12
 -
 20230323_182415.jpg662 KB · Views: 9
 -
 20230323_182346.jpg716.3 KB · Views: 9
 -
 20230323_182212.jpg545.9 KB · Views: 8
 -
 20230323_182133.jpg749.4 KB · Views: 8
 -
 20230323_182015.jpg764.2 KB · Views: 8
 -
 20230323_181904.jpg718 KB · Views: 9
 -
 20230323_181630.jpg586.9 KB · Views: 9
 -
 20230323_181607.jpg664.2 KB · Views: 9
 -
 20230323_182350.jpg725.8 KB · Views: 12
OK, good idea.For RL850 it's better to add a small Radiator (TO220 size) on the Q4 transistor (the 3 mow motor need power and Q4 can overheat and burn if you mow on very high grass).
")
Richtel
Well-known member
Hallo, ja soweit funktioniert alles. Akkuladen klappt auch. Hab noch nicht alles komplett durch getestet.Und kann schon jemand Feedback geben, ob alles funktioniert?
Can anyone already give feedback if everything is working?